9.27.2017

Our Florida Beach Condo - Floors, Ceilings, Walls, and More!

Last spring we started thinking about getting our condo painted. That led to a discussion about how much I hate popcorn ceilings, which led to the floor issues we had -- worn-out and dirty-looking carpet, and Pergo in the kitchen and hall bathroom (not ideal). Jim agreed we should get a price for all of the work, plus 2 new vanities in the bathroom. A local contractor gave us a good price for all of the work. He has done a lot of work in our complex so we figured he knows the buildings well. 

Our place was in good condition when we bought it but I felt like these issues - especially the old carpets - might discourage return renters. Those with vacation rental properties know how valuable return renters are! 

So, we got a move on. First up, we selected flooring. We had good luck with the peel and stick luxury vinyl tile in our master bathroom so I was inclined to go that route, but our contractor suggested the floating type that locks. I did a ton of research and saw that it had some advantages and was potentially quieter than peel-and-stick if you use an underlayment (not required though). I had been considering a rustic pine floor, but when I saw this option at Lowe's, I knew that was the winner.

In person, it looks a bit darker than this but it's the perfect beach house floor - the color of sand!

For the walls, I went with an off the shelf bright white from Sherwin Williams. We had white before and I always liked it.

Finally, we chose a 3.5" plain stock baseboard. My dad had already installed this in the master bathroom after we did the floor last year. I want a clean cottage feeling in here.

All of the work took place over the course of a month or so. It was a little nerve-racking to use a contractor we had never met in person and pay him for work we could only see in pictures! Fortunately he came with great reviews from other owners in our complex so we took a shot. It worked out beautifully!

Last week I went down by myself and spent 3 days putting things back together and updating a few of the decor pieces. Our contractor had rehung all of our art but we needed a few more things like a mirror in one bathroom, a new shower curtain rod, and a couple of new lamps.

And here's how it looks now:


You can see the baseboards in this photo...


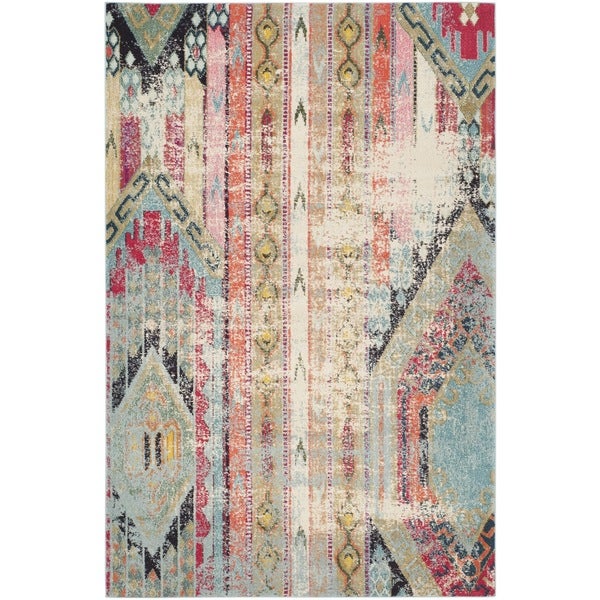
I had ordered 2 rugs from Overstock during a big summer sale (isn't there always a sale on Overstock?!). This for the living room (LOVE!):


And this for the master bedroom: 


I love the living room rug, but I'm still getting used to the navy rug in the master. It's darker than I'm used to but I don't think it's a bad thing. It will certainly hold up to renters since it looks distressed and it's dark - no stains will ever show! 


Neither rug was an investment piece so if something does happen to them (or I decide I hate them in a year or two), they can either be hosed off or thrown out! You may also notice that we updated all of the ceiling fans last year. 

We also had new vanities installed in both bathrooms. Although they are a big improvement over the old ones - higher, drawers, clean (!) - they still feel a little small and cheap. The cultured marble counters are not likely to last for the long haul but they will certainly get us through a few years.

Hall bath:

Master bath:

I will never understand why the original designers put a tub in the master and a step-in shower in the hall bath!! This is not a luxurious tub - I would much prefer a shower in the master bath. Some day maybe. 

The color in both bathrooms is blogger bathroom favorite - Sherwin Williams Sea Salt. When you read a lot of blogs like I do, you start to see patterns with paint. There are countless blogger bathrooms painted in Sea Salt and now I can see why! It's a gorgeous, classic color that goes with pretty much everything. 

All of the art you see in the pictures came from HomeGoods in Venice, Florida. That place is the gold standard of HomeGoods stores and I have been to a lot!!! For those in the Sarasota area, don't mess around anywhere else. The art pieces there were unbelievable and so perfect for what I was looking for. The mirror in the master bath came from Ross - only $24. Can't beat that. The one in the hall bath came from HomeGoods YEARS ago - it has a big scratch on one side but it was only $12. 

I also bought this new piece of art for over the sofa also at HomeGoods.  

I stared at this piece for at least 20 minutes in the store. Walked away to the register and then went back to buy it after sending Jim a picture. He came back very quickly that he liked it. When I told him it was $40 he said to get it! He loves old cars, I love the beach, and my kids love to surf so this seems like the perfect piece for our beach condo.


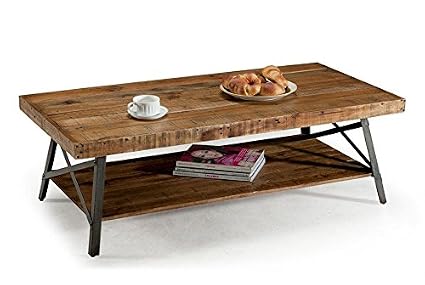
I should also mention that coffee table which everyone should get! I saw it on another blog (Mix and Match Mama maybe?). Then I broke the glass on our old coffee table. I could have replace the glass but the wicker on that table was not in good shape (and I am really trying to de-wicker this place as much as possible). Seriously, for $149 and free shipping, what's not to love!?!

Final update was to change out the bedding in the guest room. I never really liked the striped comforters but they served the purpose for 2 years. I really wanted quilts since they are easier to wash than a comforter and they stay neater. I also like sleeping under a cotton quilt instead of a duvet. I found one of these on clearance at Marshalls and then stalked several Marshalls/TJ Maxx/HomeGoods stores without any luck. Finally found a second on eBay for only a little more than the first. Sold! I love them. the gray-blue pillows are also from the Venice HomeGoods. 


We also put this sweet little desk in there last year. It was from Target (no longer there that I can find), and it's the perfect small size for a lap top set-up. The drawer holds some random desk supplies like a stapler, pens and notepads. Most of our renters are there for a month or more so a desk area is a nice plus for them. That cute lamp was from Ross. The cord is braided and blue. So adorable. 


The chair is a spare dining chair that can be pulled into the kitchen as necessary for guests. I haven't found a rug for this room yet. I am thinking about getting something pretty neutral because the comforters are borderline obnoxious! I saw a shaggy rug at Ross that I might send down with my parents in a few weeks. Another option is a fake sisal rug. The closet in this room holds a lot of beach chairs and gear so the sand gets everywhere eventually. 

If you are interested in renting the condo, we have availability for October 2017 and late June 2018 through October 2018. It's a 2-week minimum rental but the affordable price makes even a 9 or 10 day stay worth that price. A lot more info can be found on our condo web page.


2.13.2017

Last Minute Valentines for Kids

My kids finished up their Valentines yesterday (2 days early!!) so I thought it would be great to share in case you are looking for ideas! Both of these were very easy!!

My 10-year old daughter has discovered Pinterest and found these pretty quickly. There's a fine line between cool and not cool in 5th grade, but I know she wanted to have something creative for her friends. Also, our school does not allow food or candy Valentines (which I love actually!). I found the straws in 6-packs at the dollar store.


My son is obsessed with Star Wars so it was only natural that we find a Star Wars option for him. I had remembered that we made lollipop Valentines for my daughter years ago so we tried to recreate that for him but without candy! 


These were totally created on my phone! I took the picture and then added the text using Font Candy then printed them at my local CVS. Then we punched a hole in his "hand" with a standard hole punch. Pushed the glow bracelet through - be careful not to "snap" them so they start glowing too soon! We also put the connector on the back which helped to stop it from going all the way through. Finally, I taped each on the back, which caused the photo to ripple but still the effect is great! Probably one of my favorite Valentines ever! 

Happy Valentine's Day!


1.11.2017

Our Florida Beach Condo - Master Bathroom

Last October, the kids and I headed down to Florida for Columbus Day weekend. The plan was to actually stay in our condo (the kids had never spent the night!), visit my parents (they live in the same community) and relax a little. Unfortunately Hurricane Matthew was also visiting Florida the same weekend. I had major doubts that our late Thursday night flight to Sarasota would leave on time but we only left about 10 minutes late. Who knew?

Now, I do think it's important to stay in your rental property at least once per year so you can get an idea of what is good and not so good. Otherwise, it's hard to know if the showered is lame (ours was!) or the pillows need replacing (ditto). We rent a lot of houses for vacations and we are always happy to give owners feedback on what they should consider updating, getting or replacing. I am happy when our tenants do the same!


Of course, besides relaxing, I had high hopes for replacing the master bathroom floor which my mother had

told me was pealing and generally looking pretty gross. It was 20 year old linoleum and it was permanently yellowed so it certainly had seen its day. I had originally thought we would just tear out the old bathroom but reality set in and other priorities came first so we decided to just replace the floor and keep everything else until a bigger reno down the road.

At our local Home Depot, I had checked out the new peal and stick vinyl floors everyone is excited about. The wood-look was nice but I really wanted tile in the bathroom. I was really attracted to the Travertine look because it's beachy and won't show sand or hair. Bonus. I sent the specs to my dad and he picked some up at the Sarasota store along with some grout.

Friday morning brought cooler temps and light winds so the kids were happy to lounge around. My dad and I got to work on the bathroom floor!!

Here's the up close "before" picture. We pulled out the toilet and baseboard. The toilet was in good condition and fairly new so it stayed but the baseboard was total junk so my dad replaced it.


Here's the master handyman figuring out how we're going to handle the tile near the toilet. Right after this I told my dad that I think we should just try to pull out the whole floor. It came out in a couple of big sheets - it wasn't even really glued down. Amazing. Unfortunately I didn't take a picture of the bare floor.


 Nice '80s wallpaper behind the toilet.
The process from there was very fast. We scraped the minor glue residue and then cleaned the floor with some cleaner my dad had on hand. There were some hairline cracks that we probably would have filled if we were using ceramic or porcelain tile but we decided the floor would flex enough to withstand cracking. Then we laid the tiles down for a dry fit up to the point that you see below. Then we pealed and stuck them down. 


We used some books with paint cans on top to hold them down in spots where we thought they might lift a little or just on some of the corners that would see a lot of traffic. 


We went for an afternoon swim and then I grouted it before dinner. We used a bag of grout although I don't have the color (it's at the condo!). It looked really great when it was done. It goes on just like tile but it's even easier to clean it off the vinyl.


My dad subsequently installed the baseboards behind the toilet and on the other two short walls. (no joke - it's probably 6 feet of baseboard total!!). We actually bought enough vinyl tile to cover the area under the vanity too when the time comes. I'd love to rip that vanity and medicine cabinet out next October. Not sure that will happen or not but it would really finish this bathroom for the next 15 years. The tub tile is actually in great condition.

We have a lot of weeks available this summer in case you are interested! It's Unit 706 in White Sands Village, Sarasota, Florida. Send me an email (houseography / at / gmail.ccom) if you are interested.

So, that's the story of the quick bathroom reno!


11.15.2016

A New Mudroom

You may remember that one of the things our house never had was a true mudroom. There are several spaces that sort of act like a mudroom, but none of them were really achieving what we needed with two kids in school and multiple sports each. The lacrosse gear alone may kill me.

This space was the closest we had to a mudroom. Our side entry is directly off our driveway and our main family/friends entrance and exit. If you know us, you use the side door. Generally you walk in without knocking or a quick knock and a "HELLO?!". That's the way we are. This area was an obvious spot for a row of hook and a boot tray.


Thanks to my blog I know that this has been working for us for nearly 6 years. But the backpacks, shoes and coats are bigger and more plentiful so now we had to make a new choice.

We decided that our basement was the best choice. The stairs you see on the left in the picture above lead to our basement. It's only a half-flight down (about 8 stairs) so it's not a long trek, but it was enough that gave me pause to think about it. I also wasn't sure I wanted the mess in my basement especially since it's mostly carpeted (there's a small tire area at the bottom of the stairs). So, we went with this space which previously held a rarely used desk.


I started pinning ideas I liked and it was pretty clear that I liked white divided built-ins with a wood seat. I thought about doing a column of bins on the side for easy access but ultimately decided that wider cubbies would be a better option. I'm so glad we did that - swim backpacks are huge!

We went with a bead board back to match the built-ins across the room (only about 8' feet away!).


As you can see we pulled the carpet back so the built-ins would sit on the floor. We know that we will someday rip this carpet out so we are preparing for that day. I'm in love with the new wood-look linoleum! If you are worried about reattaching the carpet, it's not hard. You have to rent a "kicker" at a tool rental shop and knee it back in place. It took Jim about an hour to finish that up including the 2 minute drive to and from the rental place! 

We called in the painter to paint everything out. Jim stained the bench top before installing the top but the painter did a couple of coats of polyurethane for us. 


One hurdle was the intake vent on the lower left hand side. We solved that by removing the cover and cutting out the grooves of the wood. We have several intakes for the HVAC so it's not an issue if this one is getting slightly less air than previously. 

And here's the final! 


It took a little while but I found baskets that fit the upper space perfectly. The plastic bins at the tippy top hold extra hats, scarves and gloves that we don't use often or are for a special purpose like skiing! 


The area on the left has tile so we added a few hooks for especially wet things like snow pants and rain coats. Wet boots can stay in this area. We also added a not-so-beautiful plastic runner. It serves the purpose of keeping the carpet dry and relatively clean. We can pull it up and hose it off if we need to but it has nubs on the back that keep it from moving. More functional than pretty but it's working! 


And here's the distance from the old "mudroom" to the new one in case you were curious. Oh, and we finally painted the basement the same gray (Benjamin Moore Revere Pewter) as the rest of the house. Although I love yellow in basements, the cohesiveness is so much better. 


Overall, this was a great project and worthwhile investment in our house. I think we're ready for winter! (not really)


5.24.2016

New Wallpaper {Dining Room}

I'm super excited to share the changes in our dining room. It's really only one major change - the walls! Oh my goodness... I love it.